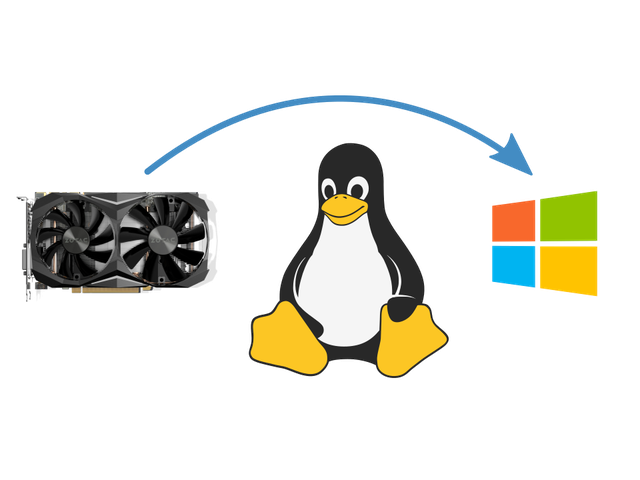
Windows, virtually (pt2)
or, virtually easy to do
What was I doing, again?
Last time around, I logged off with a plan, if a tentative one, but now it is time to get our hands dirty! To that end, a little searching around led me to a lot helpful resources, but none quite as much so as this particular blog post from a very thorough fellow called Heiko, which while perhaps a bit too in depth and somewhat out of date by now, still got me 99% of the way there, as far as KVM Graphics Passthrough is concerned.
Ok, lets get this party on the road: everything is stock on the BIOS, I go dig into my storage box and grab a Crucial BX100 1TB SATA SSD, to use as storage for my VM. Dedicated storage, of course, we are aiming for performance here.
Already on the machine is a slightly older Crucial M500 960GB SATA SSD that gets formatted and Ubuntu server 18.04.3 LTS installed fresh. Time for sanity checks and dependency install, I guess.
Note
This is not a tutorial, and you will not see the full sequence of command line instructions ready for copy and pasting. The blog post referenced multiple times will help you out with that. I'm reporting on my experience as I live it, so you'll get partial commands, the contents of configuration files after I edit them, and some numbers changed to keep myself from getting distracted in explaining why moving a card from one slot to another changes it PCI address but not its PCI id, but I'm getting distracted right now :)
We need to do background checks
Following Heiko's blog post we start by configuring the BIOS appropriately
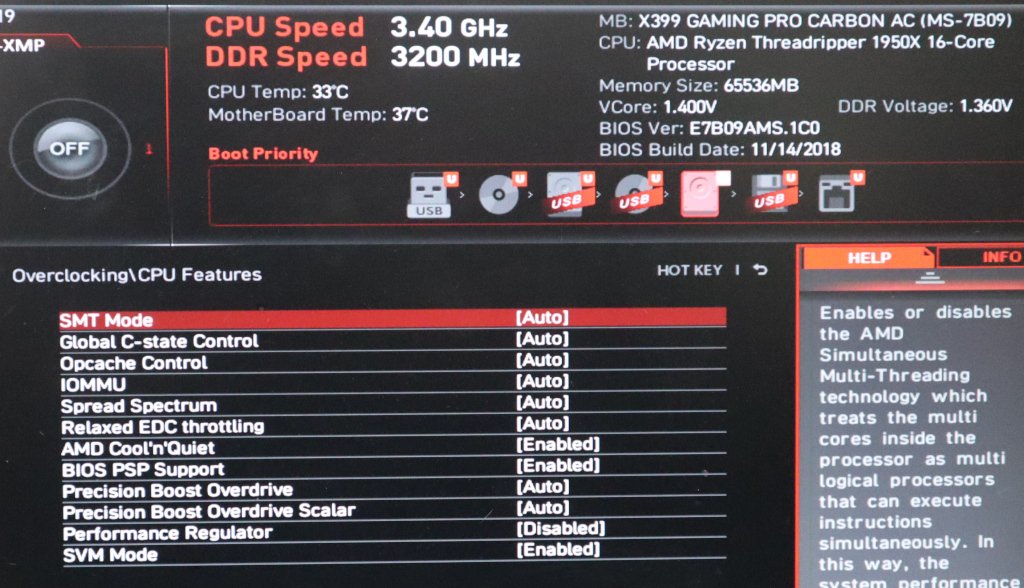
IOMMU and SVM enabled in the BIOS
and tell GRUB about it.
ce@bear:~$ cat /etc/default/grub | grep GRUB_CMDLINE_LINUX_DEFAULT
GRUB_CMDLINE_LINUX_DEFAULT="quiet amd_iommu=on"
A quick sudo update-grub and reboot later...
ce@bear:~$ dmesg | grep AMD-Vi
[ 0.825760] AMD-Vi: IOMMU performance counters supported
[ 0.825806] AMD-Vi: IOMMU performance counters supported
[ 0.848036] AMD-Vi: Found IOMMU at 0000:00:00.2 cap 0x40
[ 0.848037] AMD-Vi: Extended features (0xf77ef22294ada):
[ 0.848039] AMD-Vi: Found IOMMU at 0000:40:00.2 cap 0x40
[ 0.848040] AMD-Vi: Extended features (0xf77ef22294ada):
[ 0.848041] AMD-Vi: Interrupt remapping enabled
[ 0.848041] AMD-Vi: virtual APIC enabled
[ 0.848251] AMD-Vi: Lazy IO/TLB flushing enabled
The blog then goes into details why you need two GPUs for this, one dedicated to the VM and one for the system console. The gist of it is that although it is possible to use a single card, it is not easy nor guaranteed to work in all configurations. I shrugged my shoulders and thought "how hard can it be, really?" and we'll soon get an answer to that, I guess :)
My GPU, the Zotac GTX 1080 ti mini, definitely supports UEFI, and my system does not have an integrated graphics device, so we're good to go on this side.
On to the software side, we install everything using sudo apt install qemu-kvm qemu-utils seabios ovmf hugepages cpu-checker as instructed, which should be all we need for our proof of concept. We are going to be doing this without the help of any virtualization helper but we'll very likely move to use libvirt and virsh to ease things out. But for now, we carry on with our script.
Next up, check the GPU is actually there, which it will obviously be as although I am going through all this using an ssh connection, I can see the login prompt on the connector monitor. We also check that it has its own IOMMU group.
ce@bear:~$ lspci -nn | grep VGA
0a:00.0 VGA compatible controller [0300]: NVIDIA Corporation GP102 [GeForce GTX 1080 Ti] [10de:1b06] (rev a1)
ce@bear:~$ lspci -nn | grep 0a:00
0a:00.0 VGA compatible controller [0300]: NVIDIA Corporation GP102 [GeForce GTX 1080 Ti] [10de:1b06] (rev a1)
0a:00.1 Audio device [0403]: NVIDIA Corporation GP102 HDMI Audio Controller [10de:10ef] (rev a1)
ce@bear:~$ for a in /sys/kernel/iommu_groups/*; do find $a -type l; done | sort --version-sort
 <snip>
/sys/kernel/iommu_groups/13/devices/0000:03:00.0
/sys/kernel/iommu_groups/13/devices/0000:08:00.0
/sys/kernel/iommu_groups/14/devices/0000:0a:00.0
/sys/kernel/iommu_groups/14/devices/0000:0a:00.1
/sys/kernel/iommu_groups/15/devices/0000:0b:00.0
/sys/kernel/iommu_groups/16/devices/0000:0b:00.2
/sys/kernel/iommu_groups/17/devices/0000:0b:00.3
/sys/kernel/iommu_groups/18/devices/0000:0c:00.0
/sys/kernel/iommu_groups/19/devices/0000:0c:00.2
/sys/kernel/iommu_groups/20/devices/0000:0c:00.3
 <snip>
So, all looks good, we have the GPU and integrated audio device on their own IOMMU group, in this instance group 14, and we're going to pass the USB devices directly for keyboard and mouse, which means it is time to start assembling the qemu command line to run our VM, Yey!
ce@bear:~$ lsusb
 <snip>
Bus 007 Device 005: ID 1038:1722 SteelSeries ApS
Bus 007 Device 004: ID 05ac:0221 Apple, Inc. Aluminum Keyboard (ISO)
Bus 007 Device 002: ID 05ac:1006 Apple, Inc. Hub in Aluminum Keyboard
 <snip>
There we go, a mouse and a keyboard (that has a hub, but we'll ignore that here) ready and willing...
Digging deeper on the GPU side
After my premature conclusion that we're ready to start testing qemu configurations, which would be mostly the case if it weren't for this pesky GPU passthrough thing, incidentally the major reason for this whole effort, lets take a breath, grab a coffee and prepare the GPU side of things.
ce@bear:~$ cat /sys/bus/pci/devices/0000\:0a\:00.0/modalias
pci:v000010DEd00001B06sv000019DAsd00001474bc03sc00i00
ce@bear:~$ cat /sys/bus/pci/devices/0000\:0a\:00.1/modalias
pci:v000010DEd000010EFsv000019DAsd00001474bc04sc03i00

ce@bear:~$ cat /etc/modprobe.d/local.conf
alias pci:v000010DEd00001B06sv000019DAsd00001474bc03sc00i00 vfio-pci
alias pci:v000010DEd000010EFsv000019DAsd00001474bc04sc03i00 vfio-pci
options vfio-pci ids=10de:1b06,10de:10ef disable_vga=1

ce@bear:~$ cat /etc/modprobe.d/kvm.conf
options kvm ignore_msrs=1
options kvm report_ignored_msrs=0

ce@bear:~$ cat /etc/initramfs-tools/modules
vfio
vfio_iommu_type1
vfio_pci
vfio_virqfd
vhost-net
A quick update-initramfs -u and reboot later, we get a functional system that no longer shows a login prompt. After the kernel log message:
vfio-pci 0000:0a:00.0: vgaarb: changed VGA decodes: olddecodes=io+mem,decodes=none:owns=io+mem
that's it, no more blabbing about what things may be going on. This is the point where the vfio-pci driver takes over the GPU and the disable_vga option kicks in, I guess.
Lets check if the GPU driver is ready for passthrough:
ce@bear:~$ lspci -k
 <snip>
0a:00.0 VGA compatible controller: NVIDIA Corporation GP102 [GeForce GTX 1080 Ti] (rev a1)
 Subsystem: ZOTAC International (MCO) Ltd. GP102 [GeForce GTX 1080 Ti]
 Kernel driver in use: vfio-pci
 Kernel modules: nvidiafb, nouveau
0a:00.1 Audio device: NVIDIA Corporation GP102 HDMI Audio Controller (rev a1)
 Subsystem: ZOTAC International (MCO) Ltd. GP102 HDMI Audio Controller
 Kernel driver in use: vfio-pci
 Kernel modules: snd_hda_intel
 <snip>
There's a whole world out there
And we'll need network to talk to it. Bridge networking is the way to go, it seems... simple and effective, so as long as we're using wired networking, which we are.
ce@bear:~$ sudo apt install bridge-utils
ce@bear:~$ ifconfig
enp8s0: flags=4163<UP,BROADCAST,RUNNING,MULTICAST> mtu 1500
 <snip>
ce@bear:~$ cat /etc/netplan/01-network.yaml
network:
 ethernets:
 enp8s0:
 dhcp4: no
 bridges:
 br0:
 addresses: [192.168.1.204/24]
 gateway4: 192.168.1.1
 nameservers:
 addresses: [192.168.1.1]
 dhcp4: no
 interfaces:
 - enp8s0
 version: 2
ce@bear:~$ sudo netplan generate
ce@bear:~$ sudo netplan apply
Lost our ssh session, that's a good sign, now we are able to login on the new 192.168.1.204 address and proceed, knowing the network bridge is set up:
ce@bear:~$ ifconfig
br0: flags=4163<UP,BROADCAST,RUNNING,MULTICAST> mtu 1500
 inet 192.168.1.204 netmask 255.255.255.0 broadcast 192.168.1.255
 <snip>
enp8s0: flags=4163<UP,BROADCAST,RUNNING,MULTICAST> mtu 1500
 ether xx:xx:xx:xx:xx:xx txqueuelen 1000 (Ethernet)
 RX packets 5493 bytes 529202 (529.2 KB)
 RX errors 0 dropped 397 overruns 0 frame 0
 TX packets 1040 bytes 141683 (141.6 KB)
 TX errors 0 dropped 0 overruns 0 carrier 0 collisions 0
 device memory 0xc2300000-c231ffff
 <snip>
Groovy... I downloaded the Windows 10 iso from Microsoft and the VFIO drivers iso too, the stable virtio-win-0.1.171.iso version and armed with both, it is time to try a boot up.
Now the virtual gets real?
There's always something else, right? But at this point I guess we can just try to boot the VM. I considered using libvirt and virsh to create and manage the virtual machines, but there are two issues with that;
- When things don't work (and they never do the first time around, if we're being honest) I find it best to have as few layers to debug as possible, and libvirt is just an abstraction layer. A damn good one but not really something I want to have to fight with right now.
- My idea, the so called plan, is to create a single "template" machine and reuse the formula for multiple ones by adding storage and GPUs, and then have some way to start, stop or reset the VMs without ever having to interact with the linux host. I'm sure I can achieve this and still use libvirt but it feels like I'm removing the actual positive side of those tools and just forcing them to behave like, you know, qemu...
One thing I am not even trying to do is to use the host sound for guests. There is HDMI audio on the GPU I'm using and if that fails I'll go for a USB sound card per VM. From previous experiences, trying to get pulseaudio or alsa to play along isn't worth the grey hairs induced in the process.
With all that, our first attempt:
ce@bear:~$ cp /usr/share/OVMF/OVMF_VARS.fd /tmp/my_vars.fd
ce@bear:~$ sudo qemu-system-x86_64 \
-name winvm1,process=winvm1 \
-machine type=q35,accel=kvm \
-cpu host,kvm=off \
-smp 4,sockets=1,cores=2,threads=2 \
-m 8G \
-balloon none \
-rtc clock=host,base=localtime \
-vga none \
-nographic \
-serial none \
-parallel none \
-usb \
-device usb-host,vendorid=0x05ac,productid=0x0221 \
-device usb-host,vendorid=0x1038,productid=0x1722 \
-device vfio-pci,host=0a:00.0,multifunction=on \
-device vfio-pci,host=0a:00.1 \
-drive if=pflash,format=raw,readonly,file=/usr/share/OVMF/OVMF_CODE.fd \
-drive if=pflash,format=raw,file=/tmp/my_vars.fd \
-boot order=dc \
-drive id=disk0,if=virtio,cache=none,format=raw,file=/dev/disk/by-id/wwn-0x500a0751f002394a \
-drive file=/home/ce/win10.iso,index=1,media=cdrom \
-drive file=/home/ce/virtio-win-0.1.171.iso,index=2,media=cdrom \
-netdev type=tap,id=net0,ifname=vmtap0,vhost=on \
-device virtio-net-pci,netdev=net0,mac=00:16:3e:00:01:01

QEMU 2.11.1 monitor - type 'help' for more information
(qemu) qemu-system-x86_64: AMD CPU doesn't support hyperthreading. Please configure -smp options properly.
qemu-system-x86_64: -device vfio-pci,host=0a:00.0,multifunction=on: Failed to mmap 0000:0a:00.0 BAR 3. Performance may be slow
The screen, that previously had the last remains of the boot up messages burned into it goes blank, so something happened... but there is no VM boot image. Well, that sucks, but read the output closely and we see that the GPU failed to be memory mapped or something of the sort, probably explaining why.
a sad, sad monitor
The qemu process is stuck at 100% CPU usage, which is also weird because that's exactly one core out of our 16, when we assigned 2 cores (and 2 threads on each core) to this guest, even though apparently that failed with that hyperthreading failed message above.
A few searches on the interwebs later and it seems that the hyperthreading thing might just be a product of the qemu version I'm using, so lets upgrade that, and that will mean compiling our own.
ce@bear:~$ qemu-system-x86_64 --version
QEMU emulator version 2.11.1(Debian 1:2.11+dfsg-1ubuntu7.19)
Copyright (c) 2003-2017 Fabrice Bellard and the QEMU Project developers

ce@bear:~$ wget https://download.qemu.org/qemu-4.1.0.tar.xz
Resolving download.qemu.org (download.qemu.org)... 172.99.69.163
Connecting to download.qemu.org (download.qemu.org)|172.99.69.163|:443... connected.
HTTP request sent, awaiting response... 200 OK
Length: 54001708 (52M) [application/x-xz]
Saving to: ‘qemu-4.1.0.tar.xz’

qemu-4.1.0.tar.xz 100%[============================================================================>] 51.50M 17.6MB/s in 2.9s

‘qemu-4.1.0.tar.xz’ saved [54001708/54001708]

ce@bear:~$ tar xf qemu-4.1.0.tar.xz
ce@bear:~$ cd qemu-4.1.0/
ce@bear:~$ sudo apt install build-essential pkg-config libglib2.0-dev libpixman-1-dev libusb-1.0-0-dev flex bison
ce@bear:~$ ./configure
ce@bear:~$ make
 <snip>
 LINK x86_64-linux-user/qemu-x86_64
ce@bear:~/qemu-4.1.0$ sudo apt remove qemu-system-common
Reading package lists... Done
Building dependency tree
Reading state information... Done
The following packages were automatically installed and are no longer required:
 dconf-gsettings-backend dconf-service fontconfig fontconfig-config
 fonts-dejavu-core glib-networking glib-networking-common
 glib-networking-services gsettings-desktop-schemas gstreamer1.0-plugins-base
 gstreamer1.0-plugins-good gstreamer1.0-x ipxe-qemu
 ipxe-qemu-256k-compat-efi-roms libaa1 libasound2 libasound2-data libasyncns0
 libavc1394-0 libbluetooth3 libbrlapi0.6 libcaca0 libcacard0
 libcairo-gobject2 libcairo2 libcdparanoia0 libdatrie1 libdconf1 libdv4
 libfdt1 libflac8 libfontconfig1 libgdk-pixbuf2.0-0 libgdk-pixbuf2.0-bin
 libgdk-pixbuf2.0-common libgraphite2-3 libgstreamer-plugins-base1.0-0
 libgstreamer-plugins-good1.0-0 libgstreamer1.0-0 libgudev-1.0-0
 libharfbuzz0b libiec61883-0 libjack-jackd2-0 libjbig0 libjpeg-turbo8
 libjpeg8 libmp3lame0 libmpg123-0 libogg0 libopus0 liborc-0.4-0
 libpango-1.0-0 libpangocairo-1.0-0 libpangoft2-1.0-0 libproxy1v5 libpulse0
 libraw1394-11 librdmacm1 libsamplerate0 libsdl1.2debian libshout3
 libsndfile1 libsoup2.4-1 libspeex1 libspice-server1 libtag1v5
 libtag1v5-vanilla libthai-data libthai0 libtheora0 libtiff5 libtwolame0
 libusbredirparser1 libv4l-0 libv4lconvert0 libvisual-0.4-0 libvorbis0a
 libvorbisenc2 libvpx5 libwavpack1 libxcb-render0 libxcb-shm0 libxdamage1
 libxen-4.9 libxenstore3.0 libxfixes3 libxrender1 libxv1 libyajl2
Use 'sudo apt autoremove' to remove them.
The following packages will be REMOVED:
 qemu-kvm qemu-system-common qemu-system-x86
0 upgraded, 0 newly installed, 3 to remove and 0 not upgraded.
After this operation, 26.2 MB disk space will be freed.
Do you want to continue? [Y/n]
(Reading database ... 75036 files and directories currently installed.)
Removing qemu-kvm (1:2.11+dfsg-1ubuntu7.19) ...
Removing qemu-system-x86 (1:2.11+dfsg-1ubuntu7.19) ...
Removing qemu-system-common (1:2.11+dfsg-1ubuntu7.19) ...
Processing triggers for man-db (2.8.3-2ubuntu0.1) ...
ce@bear:~/qemu-4.1.0$ sudo apt remove qemu-utils qemu-block-extra
Reading package lists... Done
Building dependency tree
Reading state information... Done
The following packages were automatically installed and are no longer required:
 dconf-gsettings-backend dconf-service fontconfig fontconfig-config
 fonts-dejavu-core glib-networking glib-networking-common
 glib-networking-services gsettings-desktop-schemas gstreamer1.0-plugins-base
 gstreamer1.0-plugins-good gstreamer1.0-x ibverbs-providers ipxe-qemu
 ipxe-qemu-256k-compat-efi-roms libaa1 libaio1 libasound2 libasound2-data
 libasyncns0 libavc1394-0 libbluetooth3 libbrlapi0.6 libcaca0 libcacard0
 libcairo-gobject2 libcairo2 libcdparanoia0 libdatrie1 libdconf1 libdv4
 libfdt1 libflac8 libfontconfig1 libgdk-pixbuf2.0-0 libgdk-pixbuf2.0-bin
 libgdk-pixbuf2.0-common libgraphite2-3 libgstreamer-plugins-base1.0-0
 libgstreamer-plugins-good1.0-0 libgstreamer1.0-0 libgudev-1.0-0
 libharfbuzz0b libibverbs1 libiec61883-0 libiscsi7 libjack-jackd2-0 libjbig0
 libjpeg-turbo8 libjpeg8 libmp3lame0 libmpg123-0 libnl-route-3-200 libnspr4
 libnss3 libogg0 libopus0 liborc-0.4-0 libpango-1.0-0 libpangocairo-1.0-0
 libpangoft2-1.0-0 libproxy1v5 libpulse0 librados2 libraw1394-11 librbd1
 librdmacm1 libsamplerate0 libsdl1.2debian libshout3 libsndfile1 libsoup2.4-1
 libspeex1 libspice-server1 libtag1v5 libtag1v5-vanilla libthai-data libthai0
 libtheora0 libtiff5 libtwolame0 libusbredirparser1 libv4l-0 libv4lconvert0
 libvisual-0.4-0 libvorbis0a libvorbisenc2 libvpx5 libwavpack1 libxcb-render0
 libxcb-shm0 libxdamage1 libxen-4.9 libxenstore3.0 libxfixes3 libxrender1
 libxv1 libyajl2 sharutils
Use 'sudo apt autoremove' to remove them.
The following packages will be REMOVED:
 qemu-block-extra qemu-utils
0 upgraded, 0 newly installed, 2 to remove and 0 not upgraded.
After this operation, 5,771 kB disk space will be freed.
Do you want to continue? [Y/n]
(Reading database ... 74921 files and directories currently installed.)
Removing qemu-utils (1:2.11+dfsg-1ubuntu7.19) ...
Removing qemu-block-extra:amd64 (1:2.11+dfsg-1ubuntu7.19) ...
Processing triggers for man-db (2.8.3-2ubuntu0.1) ...
ce@bear:~/qemu-4.1.0$ sudo make install
 <snip>
install -c -m 0644 /home/ce/qemu-4.1.0/trace-events-all "/usr/local/share/qemu/trace-events-all"
ce@bear:~/qemu-4.1.0$ qemu-system-x86_64 --version
QEMU emulator version 4.1.0
Copyright (c) 2003-2019 Fabrice Bellard and the QEMU Project developers
Now, with the newer version comes a different command line set of options, removing -balloon none, and in order to get rid of the hyperthreading warning use -cpu EPYC,kvm=off. But still no output on the monitor, which according to the interwebs, and in particular this post the solution is to unbind the console from the framebuffer, which I'll try now.
ce@bear:~$ sudo qemu-system-x86_64 (...)
QEMU 4.1.0 monitor - type 'help' for more information
(qemu) qemu-system-x86_64: -device vfio-pci,host=0a:00.0,multifunction=on: Failed to mmap 0000:0a:00.0 BAR 3. Performance may be slow

ce@bear:~$ sudo su -c'echo 0 > /sys/class/vtconsole/vtcon0/bind'
ce@bear:~$ sudo su -c'echo 0 > /sys/class/vtconsole/vtcon1/bind'
ce@bear:~$ sudo su -c'echo efi-framebuffer.0 > /sys/bus/platform/drivers/efi-framebuffer/unbind'
ce@bear:~$ sudo qemu-system-x86_64 (...)
QEMU 4.1.0 monitor - type 'help' for more information
(qemu)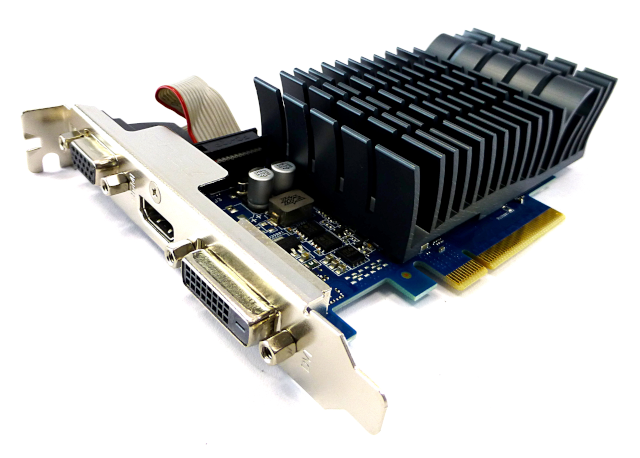
A new card just for the host
So, yey!?? Not really. Even though the error is gone I'm still getting no output in the monitor. So a little sanity check is required; am I struggling with some system or configuration issue or more simply I should have heeded the original advice that two GPUs are required for this, so we leave one for the system and another for the VM? In order to probe this I'm moving the GTX 1080ti from slot 1 to slot 4 (these are the two x16 slots in the motherboard, though it should make zero difference to use a x8 slot) and adding a new graphics card to slot 1, a very server centric Nvidia GT710, passively cooled and all.
ce@bear:~$ lspci -nn | grep VGA
0a:00.0 VGA compatible controller [0300]: NVIDIA Corporation GP102 [GeForce GTX 1080 Ti] [10de:1b06] (rev a1)
0a:00.0 VGA compatible controller [0300]: NVIDIA Corporation GK208B [GeForce GT 710] [10de:128b] (rev a1)
ce@bear:~$ cp /usr/share/OVMF/OVMF_VARS.fd /tmp/my_vars.fd
ce@bear:~$ sudo qemu-system-x86_64 (...)
QEMU 4.1.0 monitor - type 'help' for more information
(qemu)
Nope, still no image, it is a sad, sad sight...
What next? No errors on the qemu shell, so I look at dmesg next and nothing out of the ordinary. What about the syslog? Nothing there either, so what in Bob's name is happening? Heiko's blog does mention that some distribution packaged versions of OVMF are quite old and don't support many hardware combinations, and given the issue presents itself before BIOS bootup, lets try and get the latest and greatest for another try;
ce@bear:~$ sudo apt install rpm2cpio
ce@bear:~$ sudo apt remove ovmf
ce@bear:~$ wget https://www.kraxel.org/repos/jenkins/edk2/edk2.git-ovmf-x64-0-20191014.1270.gcd70b1a71d.noarch.rpm
ce@bear:~$ mkdir ovmf
ce@bear:~$ cd ovmf/
ce@bear:~/ovmf$ rpm2cpio ../edk2.git-ovmf-x64-0-20191014.1270.gcd70b1a71d.noarch.rpm | cpio --extract --make-directories
ce@bear:~/ovmf$ cd /usr/share/
ce@bear:/usr/share$ sudo mkdir OVMF
ce@bear:/usr/share$ cd OVMF/
ce@bear:/usr/share/OVMF$ sudo cp ~/ovmf/usr/share/edk2.git/ovmf-x64/OVMF_CODE-pure-efi.fd OVMF_CODE.fd
ce@bear:/usr/share/OVMF$ sudo cp ~/ovmf/usr/share/edk2.git/ovmf-x64/OVMF_VARS-pure-efi.fd OVMF_VARS.fd
ce@bear:/usr/share/OVMF$ sudo cp /usr/share/OVMF/OVMF_VARS.fd /tmp/my_vars.fd
ce@bear:/usr/share/OVMF$ cd ~
ce@bear:~$ sudo qemu-system-x86_64 (...)
QEMU 4.1.0 monitor - type 'help' for more information
(qemu)
And... now it actually works!
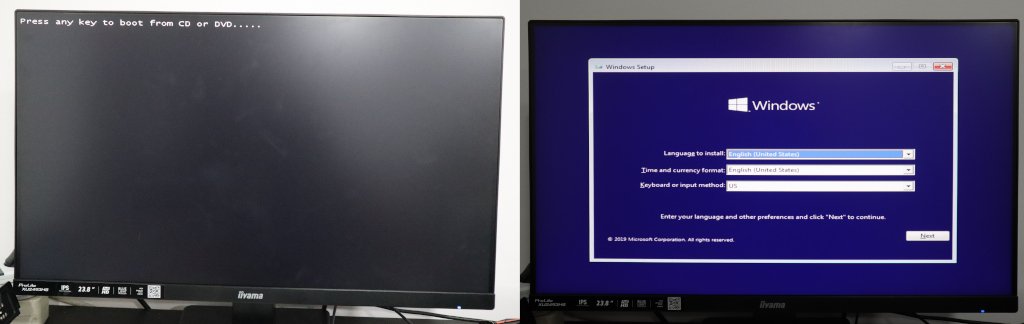
a much happier monitor
There is one thing missing, though. I am now working off two GPUs and leaving the primary for the host. We can work with this, sure, but it is less than ideal, as there will never be a need for a physical console access to the host save for hardware debug, in which situation we can just reuse the VM GPU during said debug. Since our previous attempt failed in a way that was consistent with the outdated OVMF issue we just solved, lets shut everything down, remove the primary GPU, move the GTX 1080ti to the first PCIe slot and try again.
ce@bear:~$ sudo su -c'echo 0 > /sys/class/vtconsole/vtcon0/bind'
ce@bear:~$ sudo su -c'echo 0 > /sys/class/vtconsole/vtcon1/bind'
ce@bear:~$ sudo su -c'echo efi-framebuffer.0 > /sys/bus/platform/drivers/efi-framebuffer/unbind'
ce@bear:~$ sudo qemu-system-x86_64 (...)
QEMU 4.1.0 monitor - type 'help' for more information
(qemu)
We are back to the sad, blank monitor. No errors though, so I'm assuming this is the GPU rom "shadow copy" issue mentioned in Heiko's blog, and we'll need to make a copy of the card's rom to start with, and pass it along to qemu.
But that's enough for today, we got it running! Next is the single card thing, and installing and benchmarking the VM to see if we're lagging anywhere that is fixable. I've got a good feeling about this...